Friday, October 30, 2009

Memory Wire Bracelet


Memory wire, in this case, really has another meaning beside the bracelet having "memory" to hold its shape. When I first started making jewelry, memory wire bracelets were almost the first type I made.

They are great in that, one size fits all and they don't require a clasp. Simple stringing is all. Once you have chosen your beads and pattern, just string, turn the ends and you're done. Choosing the beads and deciding on the pattern is the fun part. The possibilities are endless.

You can make just one coil, three coils or in this case five. In looking over some of my older inventory, I found several that I still have. Not sure why they did not sell but that is for another time and discussion.


Here is one that I really like. (Hmm... I've gotten better at taking pictures too. This one seems out of focus)

I think I'll get out some of my stash and see what I can come up with. I'm really liking this technique again.

What do you think?

Thursday, October 29, 2009

Jacob's DNA Ladder Finished!


In my last post, I shared about learning a new Chain Maille weave. Mostly about the problems I was having with it. I knew that it would only be a matter of time until I was able to do it well. At least that was the thought. I received some encouragement from Rebeca at Blue Budda (where I purchased the kit)

You can see from the above picture that I was able to get a good start fairly soon. I was beginning to see the little things to do that make the weave easier to do. Actually, the things I was NOT doing that would make it easier. This pattern, to me, seems to require some spacial ability. (I learned a long time ago that is not my strong suit) But I persevered and finally "saw" the way it should go together. After that, the weave seemed to come together for me and I started to wonder "What was your problem, Bev?"


So, here is the finished necklace. It is about 24 inches long, just a great length for this time of year.

I especially like the clasp that was provided and how the whole necklace finished.


I'm looking forward to making some variations.

How do you like the finished product?

B

www.bevsjewelry.com and www.bevsjewelry.1000markets.com

Monday, October 26, 2009

New Chain Maille Pattern


Last week I purchased a Chain Maille kit from Blue Budda Boutique. I've known about Blue Budda for quite awhile. However, I learned most of my Chain Maille techniques from Urban Maille. One of the differences between the two is how they measure their rings. Yep, the measurements. Urban Maille uses millimeters and Blue Budda uses inches. It makes it hard to go back and forth and compare one set of measurements with the other.

Because of that I've not purchased anything from Blue Budda before. (I like using millimeters.) They have really nice designs, however, and the other day one of their kits caught my eye. (There is not problem of ring size conversions in a kit as you buy the whole kit and caboodle) Anyhow, the kit I chose for a necklace, is called Jacob's DNA Ladder. It has both aluminum and anodized (colored) aluminum rings. The colored rings are "captive" rings in that no other rings go through them. They just sit there, tightly held in the pattern.

The picture above shows how far I got the first DAY. The directions are fine, very clear. They even give two different methods of approaching the weave. OK, I can do this! Well, truth be told, sometimes I can and sometimes I'm all thumbs. Darn little rings! (Or words to that effect!)

Here is how far I've gotten by Sunday evening. About 7 inches.


But isn't it pretty? I can see lots of possibilities for different variations.

It is not a fast weave, by any means. At least by my means. I find it frustrating. I do expect that some time, fairly soon, I hope, it will go together faster. Right now I keep it near my computer and do a few (or one) round while I wait for things to load. This method has worked well for me when I have frustrating things to work on.

I'll post again when it is finished. What do you think of the weave so far?

B

www.bevsjewelry.com and www.bevsjewelry.1000markets.com

Thursday, October 22, 2009

South Shore Beader - Eilen Lipkind, EML Designs

I met Eileen at Homespun Treasures where we both had our jewelry designs. We immediately became friends and I remember asking her if she would like to join a group of Jewelry Designers? She said yes and we've been part of the group ever since.

Eileen, in my opinion is one of our more prolific designers. She tries anything and is always learning new techniques. The one above shows her wire wrapping talents but also her talent with fused glass. She was the first one to buy a kiln and make fused glass. She also does PMC pieces.


This is one of her "special" pieces made from a picture, fused in glass and made into a book mark. What a special gift.


Here she has taken special pictures and made them into pendants. Grandson and favorite dog!

You can see Eileen's special designs at her site and on 1000 Markets. Check them out.


B

www.bevsjewelry.com and www.bevsjewelry.1000markets.com

Wednesday, October 21, 2009

Beaded Kumihimo bracelet

This is one of the unfinished pieces I found with my Kumihimo necklaces on my card table recently.

Awhile ago I had a post on teaching beaded Kumihimo. To teach the class, I started a bracelet that was like one I had made before. The purpose was to demonstrate the technique. The picture I showed in my recent post was of the one I made before.


Since I made that one, I have found a different type of ending that I really prefer and that is what I showed my student. So, this time, I took a picture of the finished bracelet with these endings. I found these at Rings and Things but have also seen them in my local bead store. They "crimp" and do not require glue. Glue is always so messy. At least when I use glue. They are much easier to use, a real plus.

New style:
Former style:


What do you think of the different types of endings?
It can be purchased at 1000 Markets.com

B


www.bevsjewelry.com and www.bevsjewelry.1000markets.com

Tuesday, October 20, 2009

Bead Kumihimo Necklace


Here is another formerly unfinished necklace. I really like the mixture of black, gray and white beads. Somehow, to me, it looks classy. I think an appropriate name is "Salt and Pepper". What do you think? I've been trying to name my pieces.

My original intention was to add a round, flat pendant. I had it on but it needed a different type of bail and while I was working that out, I decided the necklace looked better without the pendant. It was too big and looked overpowering.

I'll be adding this soon to my web sites too.

B

www.bevsjewelry.com and www.bevsjewelry.1000markets.com

Monday, October 19, 2009

New Kumihimo Necklaces


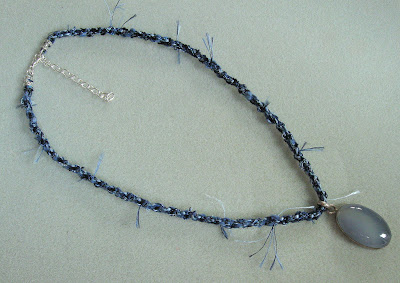
Since I had to quickly clean up my little card table when we moved the Bird of Paradise in, I made a pile of everything on the card table and have just now been looking through it. I found several unfinished pieces. This Kumihimo necklace is made from a variety of blue fibers with a pretty blue pendant. I finished it by adding a clasp and a two inch extender. I'm finding that I like extenders on necklaces. My necklines vary from turtle neck to "V" neck and require different lengths to look right.

This one is similar, just different color fibers and pendant.


Both are about 18 - 20 inches long (plus the pendant) I'll have them on my web sites very soon.

Which is your favorite?

B


www.bevsjewelry.com and www.bevsjewelry.1000markets.com

Friday, October 16, 2009

Bird of Paradise Part 2


It took us two days to get the Bird in its place. One to get it in the door and two to move it to its permanent winter location. The move involves chairs, lamps, tables and some vacuuming. Here is the Bird in its final place for now. As I type on my laptop, I can see it if I look up (as above)

The Bird started when my brother-in-law went to Hawaii in 1961. He brought back some Bird of Paradise seeds which he gave to my husband's Mother for Christmas. She proceeded to give some of the seeds to her children. Our oldest daughter was born the next May and we remember, from that occasion, how old our Bird of Paradise really is. It started out in a fairly small pot and blossomed for the first time in the spring of 1973. A big deal!

Some where we have a picture of our youngest daughter standing next to the plant with the first bloom. It was shorter than she was. (Now the plant is taller than all of us)

Anyhow, as it grew, the plant was transplanted in to ever larger containers. Some time in the '80's we divided the plant. It required shovels and a spading fork to accomplish the job. The roots go very deep and are very thick We gave away several of the smaller plants and the last and current transplanting was in to a large trash can. It could be divided again but we can't face the big job it would be.

Some time in the spring we hope to have some blooms to show. Often we have as many a 7 blooms.

One of the questions I always get when the plant is brought in from outside is "Do you get any bugs that come with it?" My usual answer is "No" Well this morning my daughter pointed out that that is not always true. I took this picture before the creature was summarily ushered out the front door.


He was on the screen right next to me on the window near my elbow. Yuck. He was BIG!


B

www.bevsjewelry.com and www.bevsjewelry.1000markets.com

Wednesday, October 14, 2009

Bird of Paradise moving day


It is that time of year when the frost danger is near and we need to move the "forest" inside.
This year I have taken up some of the "forest's" space with my workspace/table. But there is some space left for the large Bird of Paradise. That was the original plan. (Hope it works out)

The edict was given this morning that the Bird of Paradise will be coming in today. Yuck! I'm caught. I still have a small table with "stuff" on it. So, I worked some this morning and cleared the table out. You know what else is left, don't you? DUST! Both my husband and I are sneezers when dust is disturbed. Now we (I) have to vacuum.

To add to the problem, I have a dinner meeting with my South Shore Beaders Group late afternoon. Yay! My daughter has to pick up the kids from school, a birthday party, homework etc. That leaves my husband and son-in-law for the grunt work. Seems fair.

This picture was taken last winter after the Bird blossomed. It reminds us that all this work is worth it, though I'm never sure while the moving, in or out, is going on.

Note: this was written on Wed and I forgot to post it instead of just saving it. Thus the out of sync story.

B

www.bevsjewelry.com and www.bevsjewelry.1000markets.com

Tuesday, October 13, 2009

Reunion Trip

We left last Thursday for my college reunion in Rochester, NY. It is a 7-8 hour trip depending on traffic and stopping time. We made it in 7 1/2 hours, right on time. Now for those of you who are not familiar with New York State (and that may include those here in New England) I'll give you a short version of our trip. Rochester is in western New York State located just south of the NY Thruway between Buffalo and Syracuse. It may be considered "Up State" by many just because it is north of New York City. But I'll not get into that discussion here.

I've made the trip from the Albany area west to Rochester more times than I care to remember. I will tell you that it can be very boring. Pretty but boring. The longest leg seems to be from Schenectady to Utica. However, it has the Mohawk River/ Erie canal on the north side of the road. Some parts even have the railroad track following. Trains that you will see there are l o n g. We used to count the cars and often got over 100 in one train.

The river is quite wide and nowadays has lots of recreational boats. There are red and green buoys to show the safe areas to go. We saw several boats going down the river. The above picture is very common in this area. It is very nice to see so many active farms. In Canojaharie, we saw the Beech-Nut Foods plant. (Told you it was a bit boring) So, until we got to Utica we watched the river/canal come and disappear and then go under the thruway and back again.

After Utica, the exits are closer together and the trip seems to go faster then. You see such fun towns as Oneida, Chittanango, Canastota then Syracuse, Canandaigua, Weedsport, the Montezuma Wildlife Refuge and then finally, Rochester.

Finding your way around a city that you have only visited a few times in the last 28 years is fun. A GPS got us to our hotel on Main Street with out incident. There are lots of new one way streets and not the same way as before. Just to shake up the tourists.

We found our room and I took a picture from our room. You can see the main office of Eastman Kodak (Rochester's main claim to fame with Xerox - both of which are not doing well)


Here, you can see Brick Church where we were married, 50 years ago. Not the same congregation but the building is still there.


And here you can see Lake Ontario in a little strip at the top of the picture. All from our room.


The first night we had a great "Welcome" dinner at the hotel. Adjust your mind set. Go back in time 50 or so years, add gray hair, no hair, glasses etc. You get the picture. The food was great and the dessert was a huge piece of either chocolate or white cake. My friend and her husband split one of each.


All in all a good time was had by all and we then went upstairs to get ready for the next two days of gatherings.


B


www.bevsjewelry.com and www.bevsjewelry.1000markets.com

Wednesday, October 7, 2009

College Reunion


Tomorrow we take off for my college reunion. You may remember from previous posts that my husband and I celebrated our 50th wedding anniversary in July. So, you won't be surprised when I tell you it is my 50th college reunion from the University of Rochester.

I'm looking forward to seeing old friends. Reunions can be funny. You remember the funniest things and no one else does. For example, I was looking at some of the pictures I have of my 45th reunion. The funny thing is that I then had to go upstairs and remove some of the clothes I had set out to wear. The blue sweater and the striped cardigan were prominent in most of the pictures. (The ones I had set out) Now, my husband says that no one will remember. What do you think? Those people will have similar pictures even if they really don't remember exactly what I wore. Since I don't remember, do you think they will - with out looking at pictures?

I lived at home for my first two years. It was the first year of "integrating" the U of R campuses. (Men and Women) Ours was the first class to go all four years on the River (Men's) campus. We had a new 4 wing, 6 story Residence Hall. On the third floor they set aside 2 rooms for the "City Girls" I noticed in our '59 Memory Book (which we have already received) many of us have fond memories of being a City Girl. We could stay over night for $.35 (Notice computers don't have cent signs anymore?) It was $.50 if we didn't bring our own sheets. There was a small kitchen at the end of the hall. No microwaves of course.

Some nights the 6 beds were full and with bad weather or what ever I still wanted to stay overnight. I had made friends with the two girls across the hall (one was one of my bridesmaids) We put their two beds together and using empty orange juice cans to hold the inside legs together, the 3 of us slept crosswise on the two beds. The orange juice cans were necessary as the beds would slide apart otherwise. We called it "sleeping on the Rubicon" Good friends wouldn't you say?

Since I've retired and don't need to get dressed up to go to work, I haven't purchased many new clothes and what I have is not worn out, so, I'm going upstairs to see what else I have to wear. I need to get packing.

B


www.bevsjewelry.com and www.bevsjewelry.1000markets.com

Monday, October 5, 2009

South Shore Beaders - Marilyn Oliveri

Continuing my features of members of our South Shore Beaders group, today I'm featuring Marilyn Oliveri . Several members of our group met Marilyn at our favorite local bead store, Beadcache in Mansfield, MA. We had gathered in the upstairs room to meet with Linda, an employee of Beadcache who had offered to show us how to end Kumihimo ropes. We had recently learned the technique and ending it nicely was our next thing to learn. Marilyn came in and heard about our "gathering" and not to miss out on anything, joined us upstairs. One thing lead to another at it often does. She is now a regular member of our group.

We found out that Marilyn does bead crochet. The results is a similar rope to Kumihimo but in Marilyn's hands, they are spectacular. Her choice of beads, focals and color is always part of her process to make the perfect piece. Needless to say she spends many hours on each piece.

She explains her process:

"The necklace has a pendant made from bronze clay. I made a mold for the pod from a seed pod from a plant in my garden (false indigo/baptisia australis). I used a magnolia leaf as a template for the base. Completing this pendant almost became a 'career' because of some of the issues I have in working with bronze clay. I had to do multiple firings to repair cracks and joints and then simply to change the color until I was satisfied with the results. I love gardening and have extensive perennial beds so I call this one 'Seeds of Inspiration.' It's one of my favorite pieces."

Inspiration indeed! Look at the colors in the pendant and the layers!


The second piece demonstrates how an original idea transforms in to something different.

This piece is titled "Santa Fe Sunset" Her process is explained:

"I had crocheted this rope for one of my bronze pieces, but wasn't really happy with the combination. So I went searching in my box of "focal beads" and loved the coral donut with it. Then I had to figure out how I was going to combine the two pieces in a different way.

"I spent some time with Gerri at the Bead Cache and she patiently showed me various wire wrapping ideas, but I kept coming back to the larks head knot and coiled bale that I had had in mind initially. I've only just begun to fool around with wire so this was rather ambitious, but I wanted to try it.

"Then Rich brought out gold-filled half round wire which I'd never worked with, but it is SOOO elegant! I went home and used "practice" wire to try many of the techniques Gerri had shown me in addition to the larks head knot. I was pretty timid about moving on to the $9/foot gold filled wire, but as they say, nothing ventured. . .

"After an entire afternoon on top of the hour or two I spent with Gerri, I'm very proud of the result."

I really enjoy hearing the stories that go with creations made by jewelry artists such as Marilyn.

We all tend to inspire each other. These two pieces are real inspiration.

Thanks Marilyn for letting me share your talent and lovely pieces.

B

www.bevsjewelry.com and www.bevsjewelry.1000markets.com


Friday, October 2, 2009

New slide show of Lexie's Jewelry

I always enjoy reading blog posts from others. I usually learn something new. I saw this post on Pat Winter Gatherings blog. She had a nice slide show and part has the words "Make your own" Now that is an invitation, if I ever heard one.

So I clicked away and came up with this nice slide show of my Lexie Jewelry. Only a few clicks, couldn't have been much easier.

What do you think?


B


www.bevsjewelry.com and www.bevsjewelry.1000markets.com


B